PhotobucketPhotobucketPhotobucketPhotobucketPhotobucketPhotobucketPhotobucket
Showing posts with label DIY. Show all posts

February 8, 2012

Valentine's Day In A Mason Jar


I was pretty excited to incorporate mason jars into this years Valentines festivities.
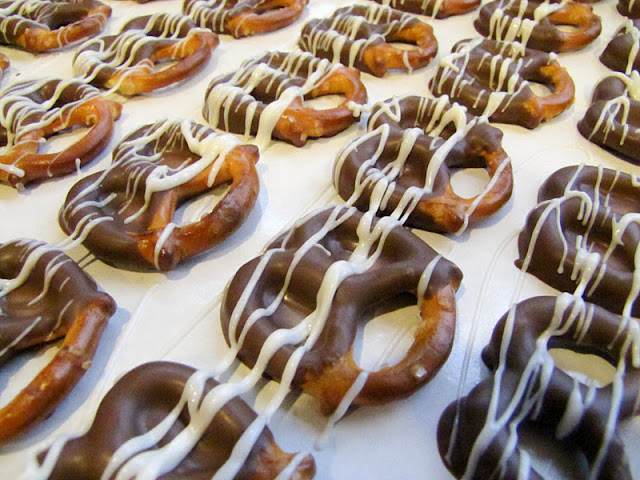
And, I have a thing for chocolate covered pretzels.
Let's be honest, the way to my heart is via salty and sweet.

Give your Valentine some home made love this year.

For this tutorial you'll need:
pretzels
melted milk chocolate
colored melting chocolates {I used pink and white}
sprinkles - optional
wax paper - makes clean up easier
 mason jars
scrapbook paper/doilies
pearl embellishments/bakers twine/ribbon

Melt down the milk chocolate pieces. Hold on to the bottom 'loop' and dip the pretzels. Let some of the excess chocolate drip off and then lay it on a piece of wax paper.
Repeat a zillion times.

Next, melt down your first color of melting chocolate.

Dip a fork in the melted chocolate and drizzle it over the pretzels.

Do the same thing with the second color until you can see both colors over the chocolate.

Once the chocolates have dried, pull each pretzel up and break off all of the random stiff pieces using your fingers.

You'll have a pretty little pile of chocolaty covered pretzels when you're done!
{you  may want to eat about 3...or 57 of these at this point. I know I did}


Since I had leftover of the pink and white, I decided to dip some more pretzels and sprinkle them with some little hearts.

For decorating the jar, I cut a doily and piece of scrapbook paper into a heart shape...

And scavenged up some fake pearls {from the $1 bin at JoAnn's} to embellish the jar.

I traced the inside of the mason lid to make a circle on some scrapbook paper.

Wrote a little love note and then screwed on the rim.

Fill the jar with pretzels and hot glue the doily and paper heart on. Tie the pearl strand in a knot, and you're done!


I made a few variations and I'm happy with the way they all turned out!
A cute way to spread some Valentines cheer.
{along with a good excuse for some chocolate covered pretzels}

Salt.Chocolate.MasonJars.
I'm in.


January 23, 2012

Homemade laundry soap {eco-friendly & cheap!}


Laundry soap is expensive. Like, whoa.
Especially if you try and buy an all natural eco-friendly brand.
I always talked myself into buying it.
You know, better for the environment, and better for our skin and it's not like we use 5 gallons a week or anything.

Still, if there's an easy way to make an all natural product for less, I'm all for it!

I researched lots of homemade laundry soap recipes (there are lots out there) and kind of picked the one I thought would work best - and be the easiest!

I tried to take some half way decent pictures of the steps that I was slightly confused about while reading the recipes, so I hope they help.

It really is easy.

Here goes!

For the entire recipe you'll need:
Water
An old laundry detergent container
1 bar Fels-Naptha soap
1 cup of washing soda (it's different from baking soda)
1/2 cup of borax
5 gallon bucket & funnel (make things easier)

The first step is to grate the bar of fels-naptha soap into a pot.
(I was surprised that it was yellow...I guess I was expecting it to be white??)


It will look like grated cheese :)
Add about 4 cups of water to the pot and melt the soap over medium-low heat, stirring every few seconds.
Fill a 5 gallon bucket 1/2 full with warm water.
Once the soap is all melted, pour the liquid into the bucket.
Then, mix in the washing soda and borax. Stir that up until it's dissolved.


Add warm tap water until the bucket is full.
Put the lid on and let it sit overnight to 'gel'.


When you open the bucket the next day, the mixture will be thick - notice the spoon is standing straight up!
We added another 4 cups of warm tap water and attempted to stir some of the large clumps out...it actually helped.


And then it's time to pour!
Notice my lovely assistant?! :)
This is when a funnel comes in handy.


Our mixture was still a little on the chunky side, but we used the back end of the spoon to help it get through the funnel.


Fill your container 1/2 way with the soap mixture.
Add warm tap water to make the container full.
Give it a good shake and you'll have your very own laundry soap!


And Ta Da! Make yourself a cute little label, and be proud of the fact you just helped the environment and saved your family money...aahhhhh, I love multitasking.


You'll have lots of soap mixture left over in your 5 gallon bucket. Just pop the lid on and save it. When your soap runs out,  add more of the mixture and more water. The 5 gallon bucket will make 10 gallons of detergent...and all for only a few dollars :)


For those who like their laundry to have more of a scent, you could add a few drops of essential oil to each container you make - lavender would be amazing!

Cheers to doing laundry!


January 19, 2012

Homemade dog treats - and a happy Lenny

If you follow me on facebook, you already know how much I've appreciated all of your kind words, thoughts and prayers. You really don't know how much it means to me.

(And if you have no idea what I'm talking about, you can click here for the story)

I've been in a bit of a susie-homemaker mode here lately, so I have lots of tutorials and fun recipes to share with you! Here's a fun one for your furry friend!


Quick & easy.
My two favorites when doing...well, anything!
These homemade doggy treats definitely fall into that category!

The real reason I wanted to make these treats is because I got a suuuuuper adorable alligator cookie cutter. I desperately wanted to make sugar cookies, but knew I'd end up consuming far too many...I have good foresight like that.

So I resorted to making doggy cookies instead, and I wasn't even tempted to taste the batter.
Okay, I did take a small taste - I'm a sucker for peanut butter...what can I say?!

Though I didn't tase the finished product, the batter was pretty good.
Your pooch will thank you for making them.
And if nothing else, it'll give you a good excuse to bust out your most festive cookie cutters.

Let's get started.

Ingredients:
1 banana
1 cup peanut butter
1 cup milk
1 tablespoon baking powder
2 cups whole wheat flour

First, place banana (I gave mine a little pre-mash) and peanut butter into mixing bowl.


Next, add in milk.


Give it a mix.
Add in baking powder and whole wheat flour (only 1/2 cup or so at a time) until a dough forms.


Flour your work surface (again, with wheat flour), roll out and cut into shapes!


Bake at 375 for about 12 minutes!
Your 4 legged friend will enjoy :)


We also packaged some up for one of Lenny's friends...he likes to share :)


Recipe via.
Plus, check out her blog for sewing projects, adorable crafts and lots of other inspiration!


These definitely got the Lenny stamp of approval.


March 16, 2011

St. Patty's Day {a DIY}

If you're anything like me,
then you've known St. Patrick's Day was coming up
you just didn't realize it was tomorrow!
Yikes!

Don't fret, because I've found the most adorable 
DIY {Kiss Me I'm Irish}
goodie baggies!

{Kierste over at brown paper packages never lets me down}


Isn't it cute?!

for the entire tutorial
{she even tells you what size and font to use}
head on over to the brown paper packages blog!


Have fun!

February 8, 2011

Valentine's Day Yummies {DIY}

I was reading along my daily blog updates this morning
{isn't there something absolutely amazing about being the only person awake and sipping coffee while reading blogs - ahhhh, bliss!}
 when I came across this super cute - and easy
...because that's really the important part...
tutorial from Blue Cricket Design on how to make chocolate covered marshmallows! They are completely darling and such a cute idea for your Valentine!

Aren't they sweet?!

For the entire tutorial, head on over to Blue Cricket Design by clicking on the image below!!


Related Posts Plugin for WordPress, Blogger...
 

Content © All Rights Reserved | Customization © 2011 Laura Jane Designs
Unauthorized use of this site's design or code is strictly prohibited.